How to Make a Slideshow
Slideshows in Odyssey are a lot like all our other workflows. On the surface, there’s a simple, streamlined way to create something remarkable. Beneath the surface, there’s a significant amount of granular control you can leverage to create entirely customizable transitions that do, well, exactly what you want.
For this workflow, we’re going to look at how to simply run a slideshow and sub out different transitions. But we’ll also look at the components that go into transitions to build something entirely customizable on your own.
Running the Slideshow workflow
Step 1 - Add your images
Add a Batch (Images) node to the Odyssey canvas then add in the range of images you’re looking to create a slideshow of.
For best results, you’ll need all your images to have the same dimensions. If your images don’t have the same dimensions, add another batch set of images, an Aspect Ratio node, a Resize node with the size input you’re looking for, and then connect it to the batch node.
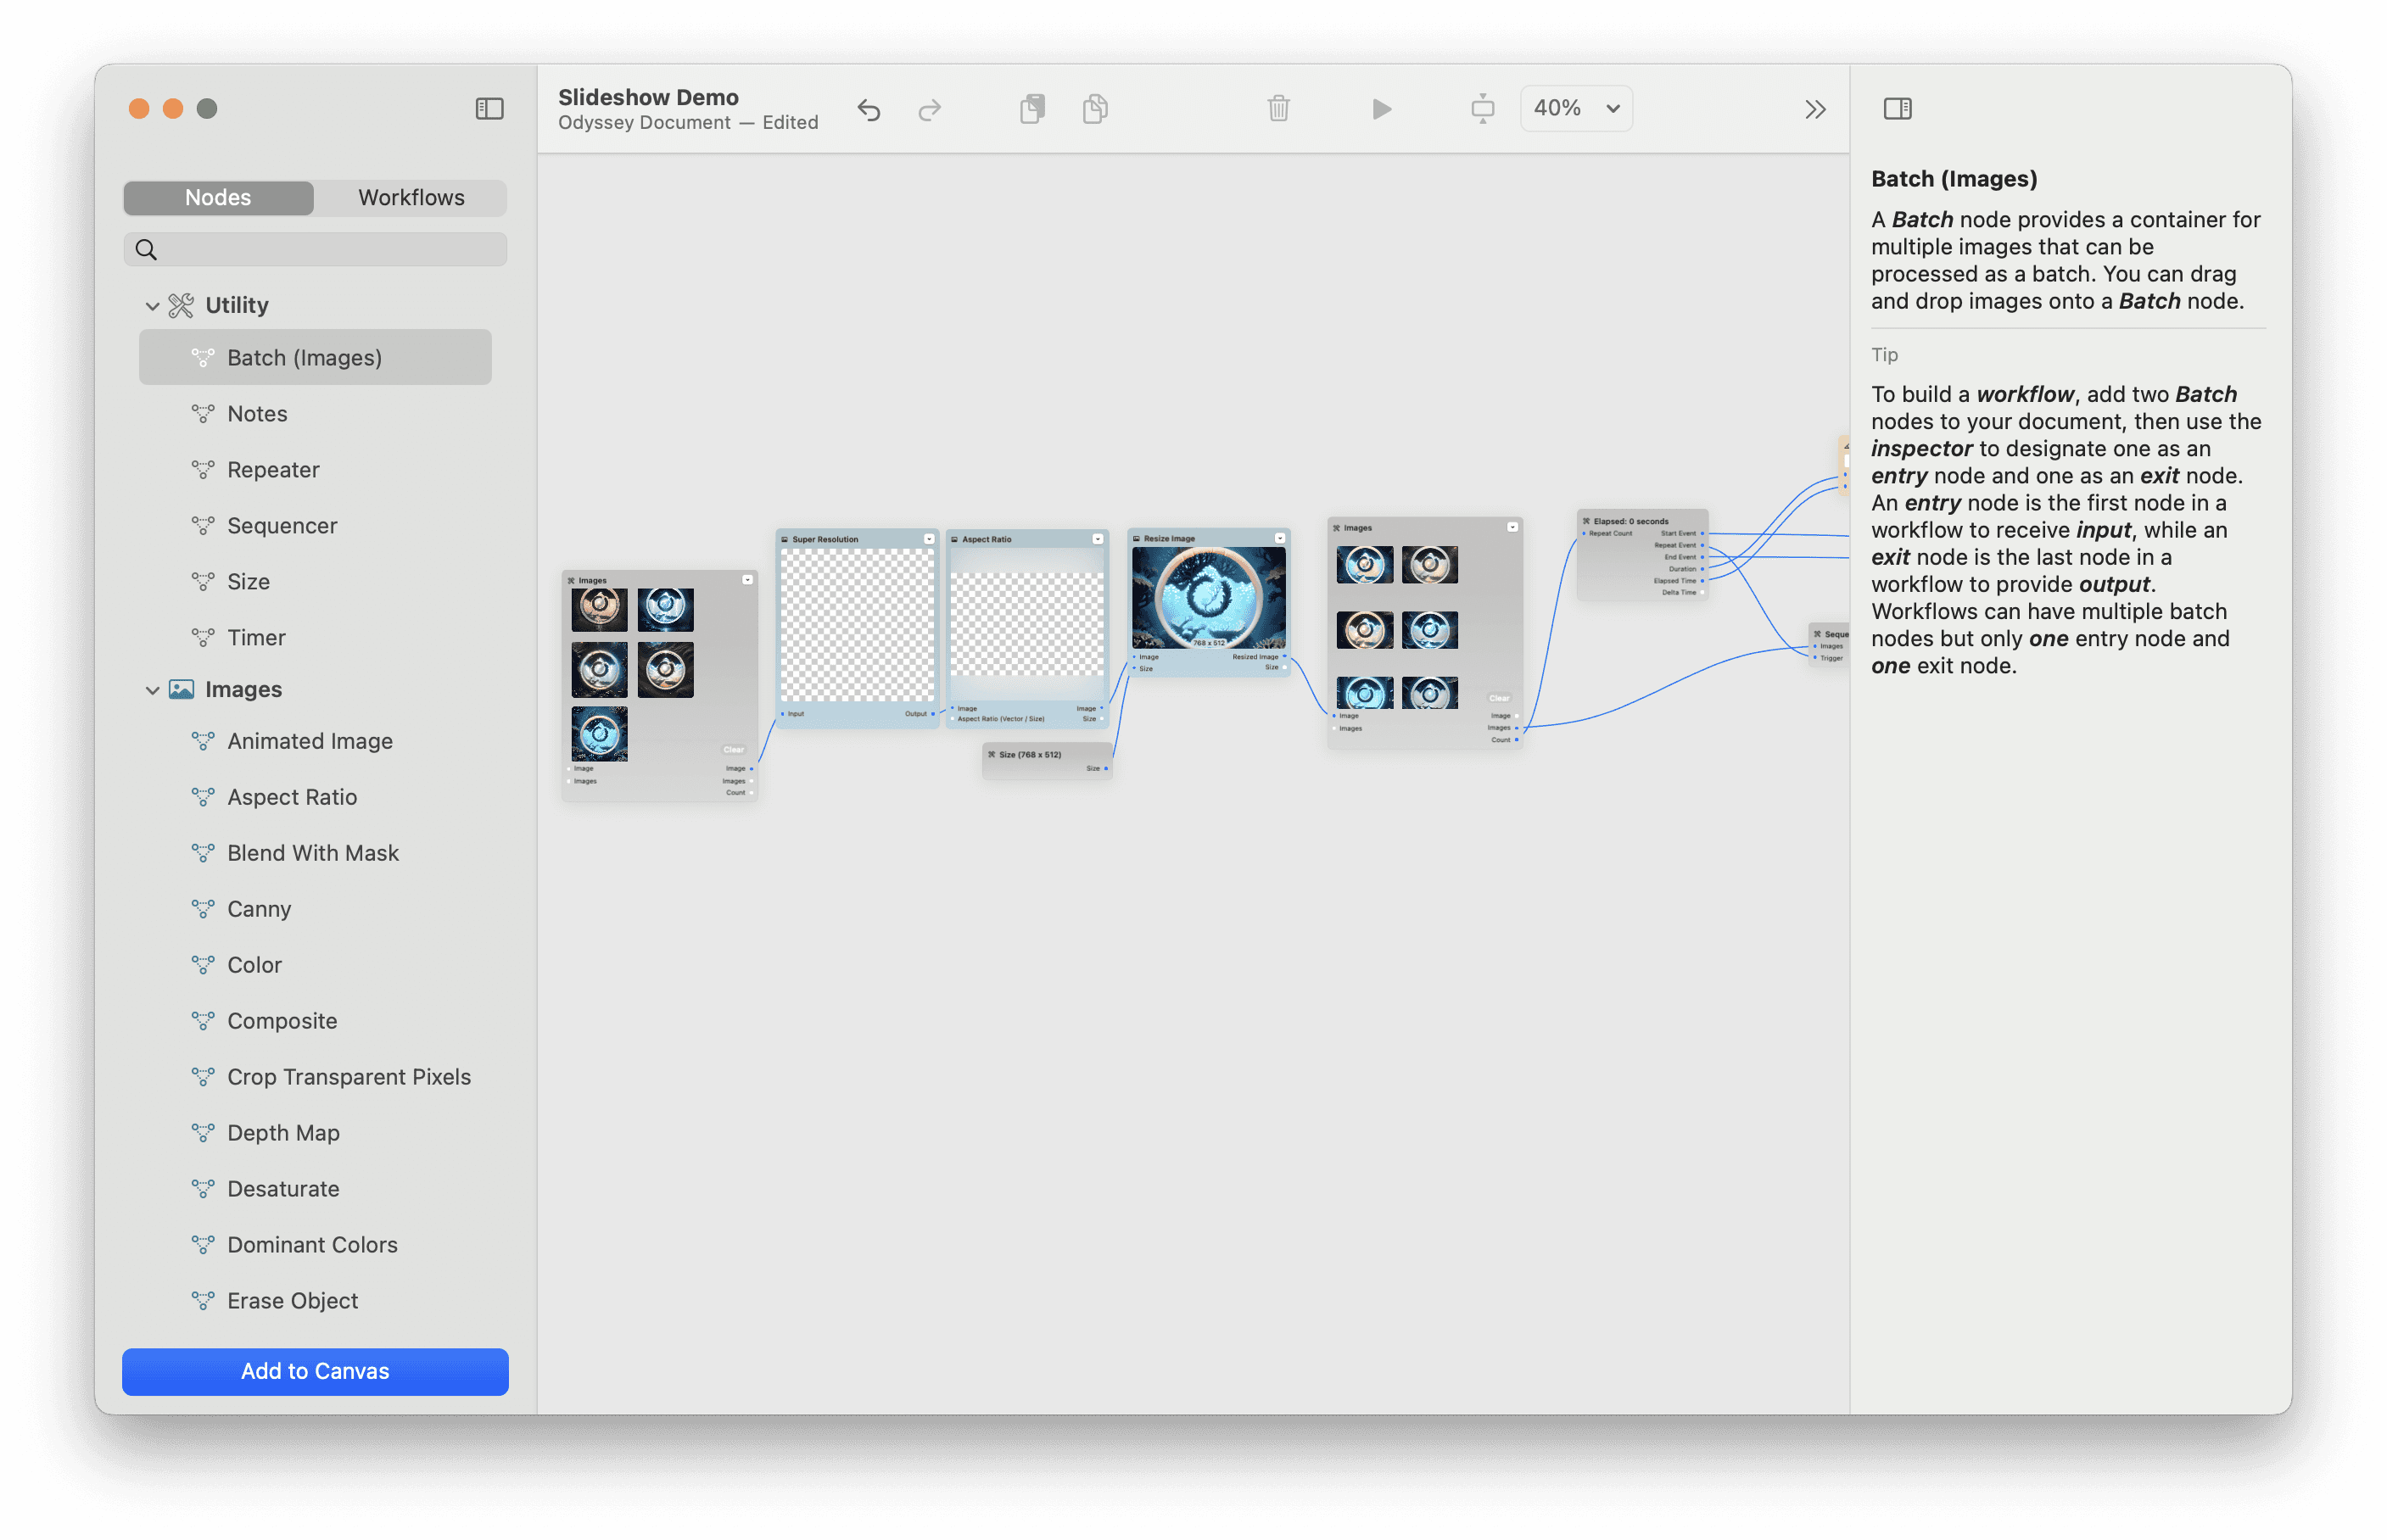
If you’re changing the aspect ratio, click run on the first batch node. This will get your images ready for your slideshow.
Step 2 - Replace the Transition node
Our slideshow workflow starts with a Cross Warp Transition node - but there are 14 other transition nodes in Odyssey. Navigating to the node panel and selecting each transition node will preview the transition in your inspector on the right.
From there, pick whichever transition node you’re looking for and add it to the Odyssey canvas.
Hook up the two image outputs from the Sequencer node to your Transition node then connect Time (Normalized) from the Divide node.
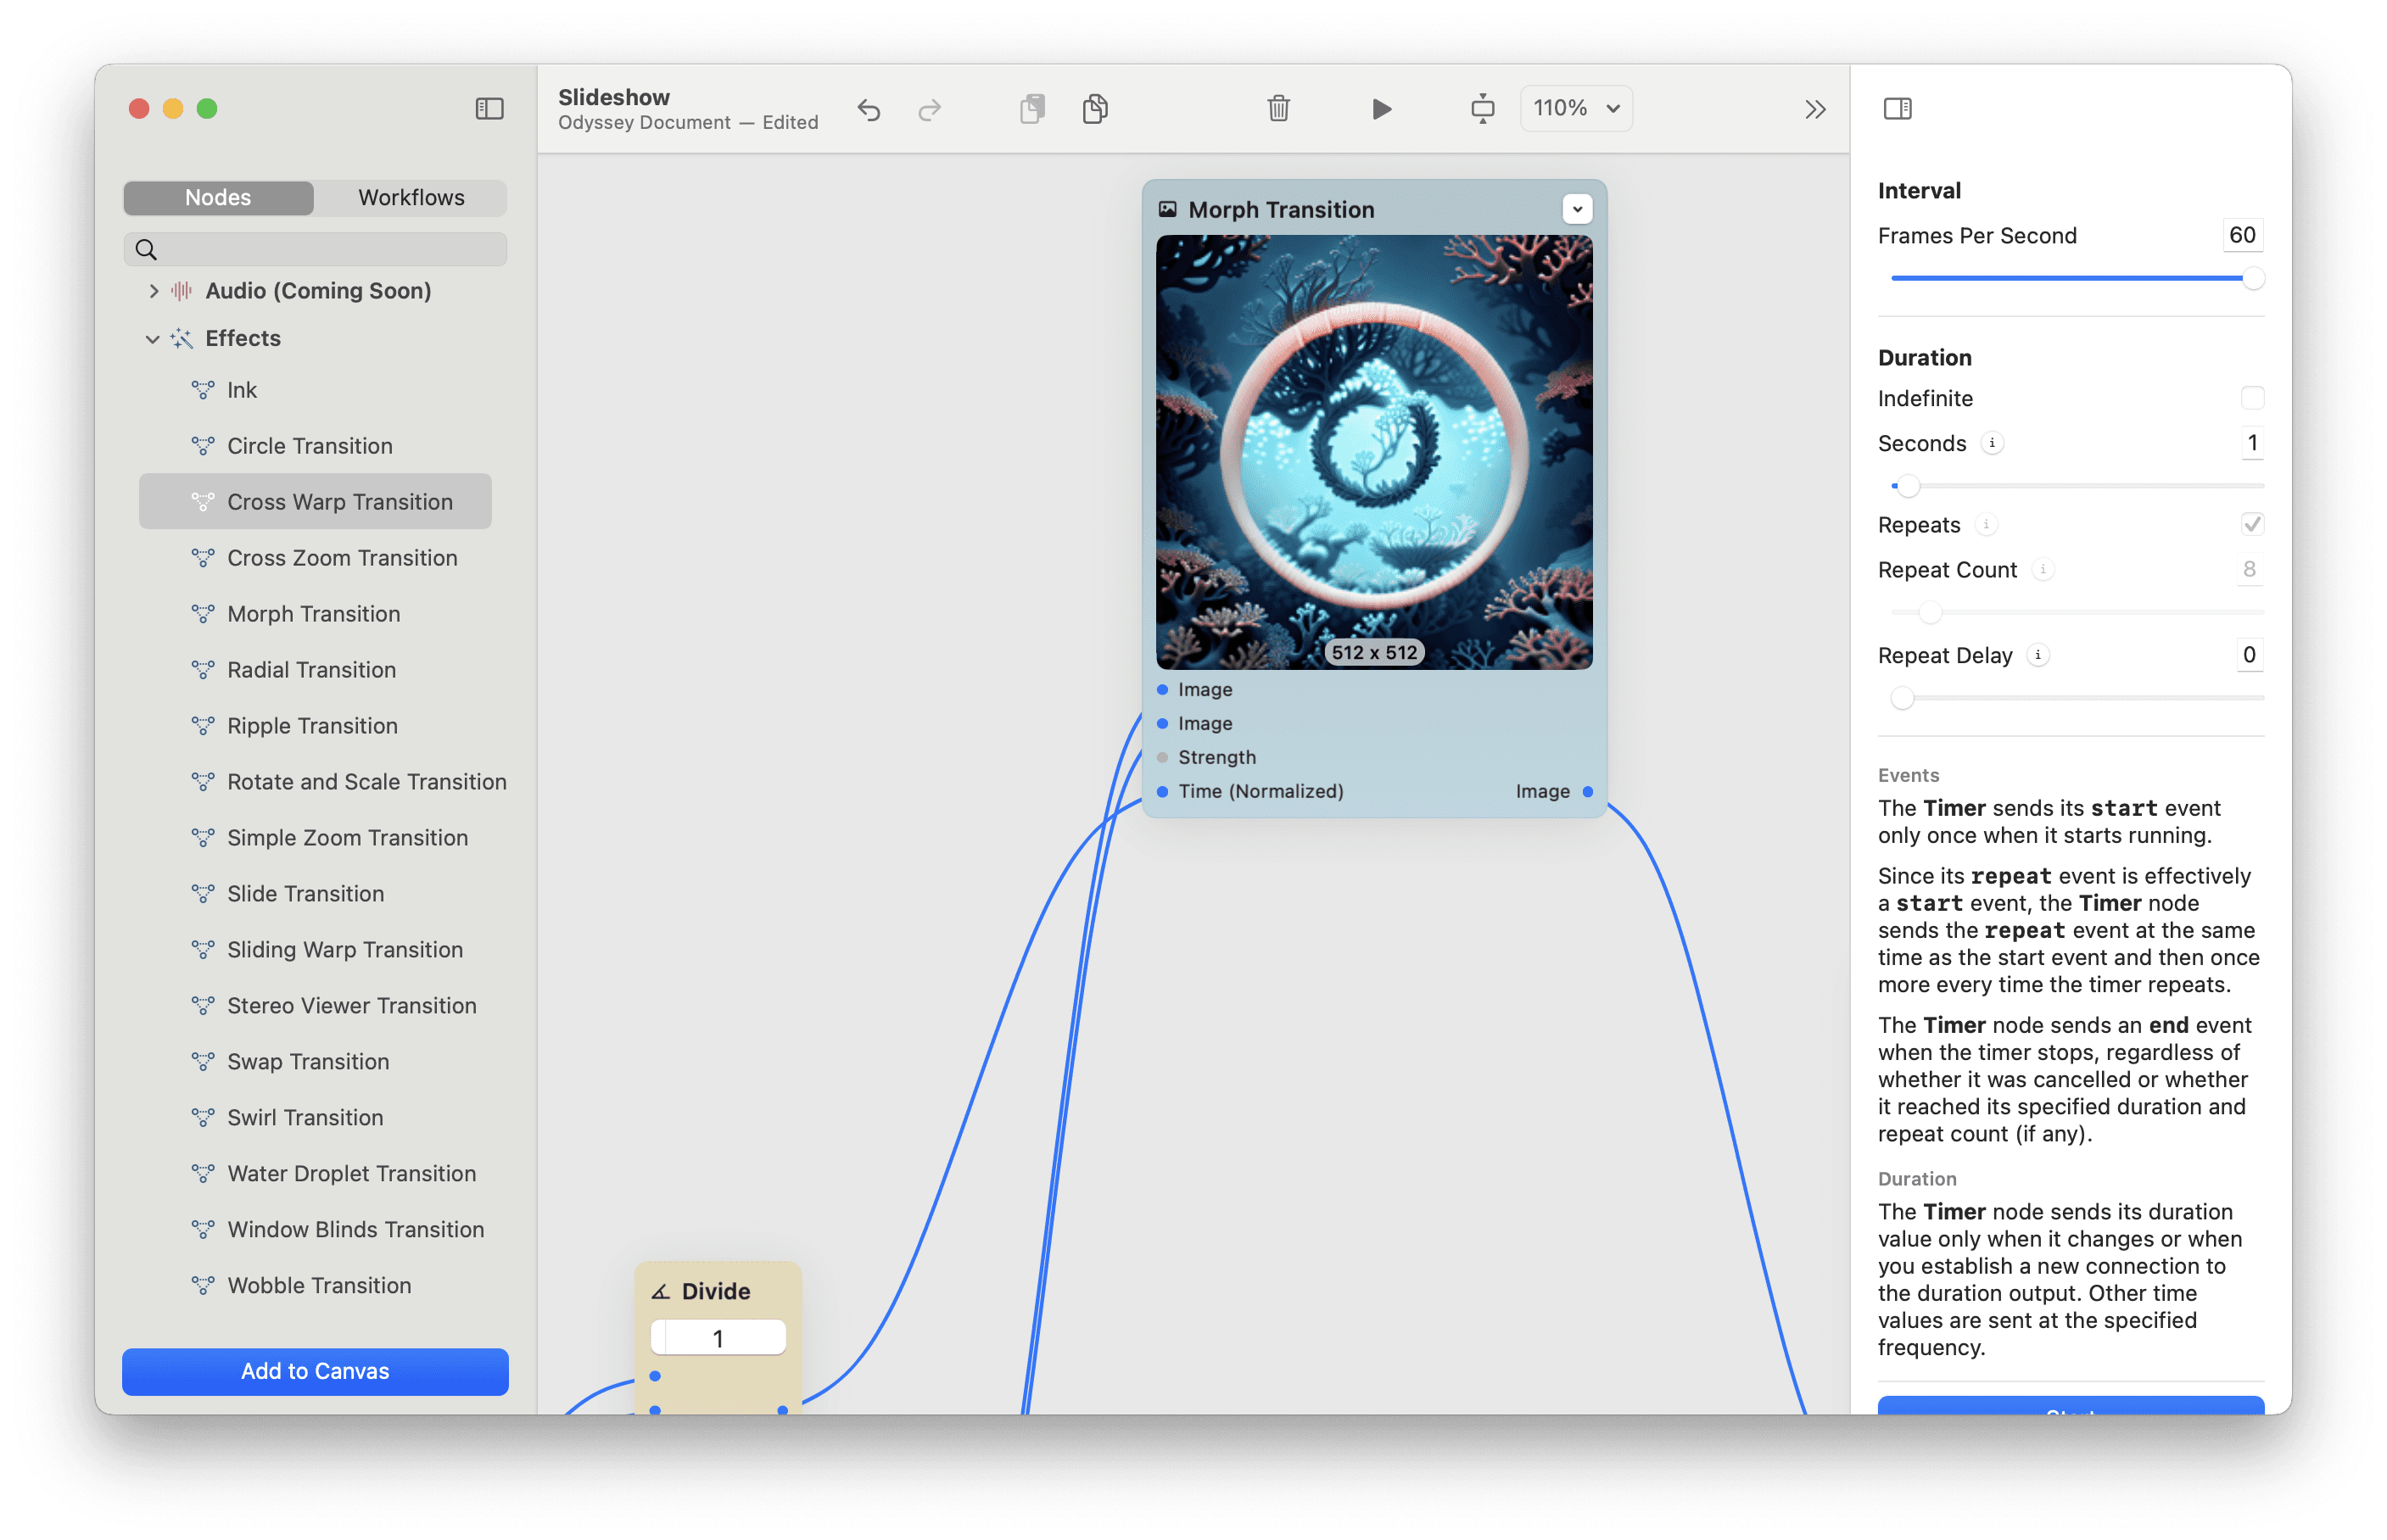
Step 3 - Run the Timer node
Next, select the Timer node. The Timer node is ostensibly being used to make your transition. This means that each value within the Timer node will be impacting the transition between images and not the entirety of the animated image you’re creating.
We default to 60 frames per second, which creates a very high fidelity transition between images. You can lower this if you’re looking for a smaller file size.
Under duration, seconds will dictate how long each transition lasts while repeat delay will determine how long the transition freezes on the input image. The Duration output divided by the Elapsed time output determines the time in the Transition.
When you click run on the Timer node, the Transition node will begin to display your transition. Cool!!!

Step 4 - Edit your Animated Image
While your transition node runs, the Animated Image node creates an animation from the Transition node. If you click on the Animated Image node, you can see the progress in action.
Once the animation has been completed, there are a few things you can do.
Under Edit, you can clear the number of frames an start again. This will require you to rerun the Transition node - but can let you better configure things like the Frames Per Second or add a bounce effect. We’ll dig into those more in-depth later.
Let’s keep the number of frames the same for now.
You can loop your playback and trim your animation. Trimming the animation brings up Apple’s native timeline editor within the node.
Realistically, you don’t have to do anything here unless you want to make additional tweaks.
Step 5 - Export your Animated Image
Odyssey supports three formats for exporting your animated image:
Animated PNG or APNG files results in a lossless, extremely high quality animation that can have transparent backgrounds and better color support. The file sizes will generally be quite large if you do not compress them. Animated PNGs are also not always supported by different browsers - so it’s best to use only if you have a very specific use case in mind
GIFs lose some color and do not support transparency but are a well established format that works across most platforms. Similarly, compressing a GIF will bring down your file size
Video export supports both H.264 and the newer H.265. H.265 results in more compressed file sizes with higher quality but has not been widely adopted yet and will take longer to generate. We support exporting files as MP4, MOV, and M4V and similarly to GIFs and PNGs, you can compress the video as well
So now that you know how to run a slideshow workflow, let’s go a little bit deeper into some of the more complex nodes and settings that are included in this workflow.
Sequencer
The Sequencer node manages a list of images and sends them on to the next node. However, instead of sending them all at once it sends them in small increments (for example, one or two at a time) when it’s told to do so.
The sequencer’s window determines how many images to send at a time. For example, with a window of 2, every time it receives a “send” instruction from its “trigger” input, the sequencer will send two images from its list.
The sequencer’s stride determines how many places to move down the list after it has sent its window of images. For example, if we start at the beginning of a list of 4 images, and we have a window of 2 images and a stride of 1 image, then we will send Images 1 and 2, move down the list by 1, and then send Images 2 and 3, and so on.
If we instead have a stride of 2, we’ll send Images 1 and 2, move our starting point by 2 (i.e. from Image 1 to Image 3), and then send Image 3 and Image 4.
In the slideshow workflow, the sequencer is what tells your transition to move through the images you provide. This is set by a “trigger” - which in this workflow is dictated by the “Repeat Event” coming from the Timer node.
Let's look at the original result.

Now let's look at what happens when you change the window to 4 while keeping the stride as 1.
Now let’s look at setting the sequencer to have a stride of 2 while keeping the window 2.

Once the sequencer reaches the end of its list, it will wrap around to the beginning of the list, and start over.
While this might seem complicated, the result is incredibly granular control over how a Transition is formed - which is challenging, if not impossible, to achieve in most other tools.
Conclusion
Odyssey's AI slideshow maker is a convenient and powerful way to transition between images to form a compelling visual story. Whether you're a professional interior designer presenting a series of room transformations, a marketer showcasing product evolution, a teacher creating educational content, or someone looking to capture and narrate life's precious moments through a digital photo album, Odyssey's slideshow maker has a myriad of compelling use cases. Embrace the full potential of visual storytelling with Odyssey and bring your creative visions to life, one transition at a time.