Generate AI QR Codes with Odyssey's Creative QR Code Maker
AI QR Codes, crafted by ControlNet's QR Code Monster model, offer a unique way to bring an artistic or branded flair to scannable QR codes. Whether you’re using these QR codes for fun or for your advertising campaigns, leveraging the power of ControlNet and Stable Diffusion to turn QR codes into remarkably unique works of art is a fascinating and creative exercise.
Creating a QR code, especially a creative QR code design, used to be challenging. You'd typically start with a basic QR code maker and then pull the design into another tool for creative embellishments - all while having to make sure it remained scannable.
Now, with Odyssey, the entire process of creating a QR code, from inception to artistic enhancement, is streamlined in one app. Odyssey is more than just a QR code maker; it's an integrated platform where you can generate a QR code, prepare it for ControlNet, and add creative touches while maintaining its functionality.
For beginners, Odyssey simplifies the process of how to make a QR code. You just enter the website URL for your QR code destination. For those looking to delve deeper, Odyssey offers numerous options to create intricate AI QR Code art.
If you're new to Odyssey, start with our essential guides for creating a QR code and navigating the Odyssey platform.
AI QR Code Workflow: Your Guide to Create a QR Code with Artistic Flair
Odyssey's workflow for creating AI QR Codes is user-friendly and robust. Here's a step-by-step guide to make this advanced QR code art generator work for you:
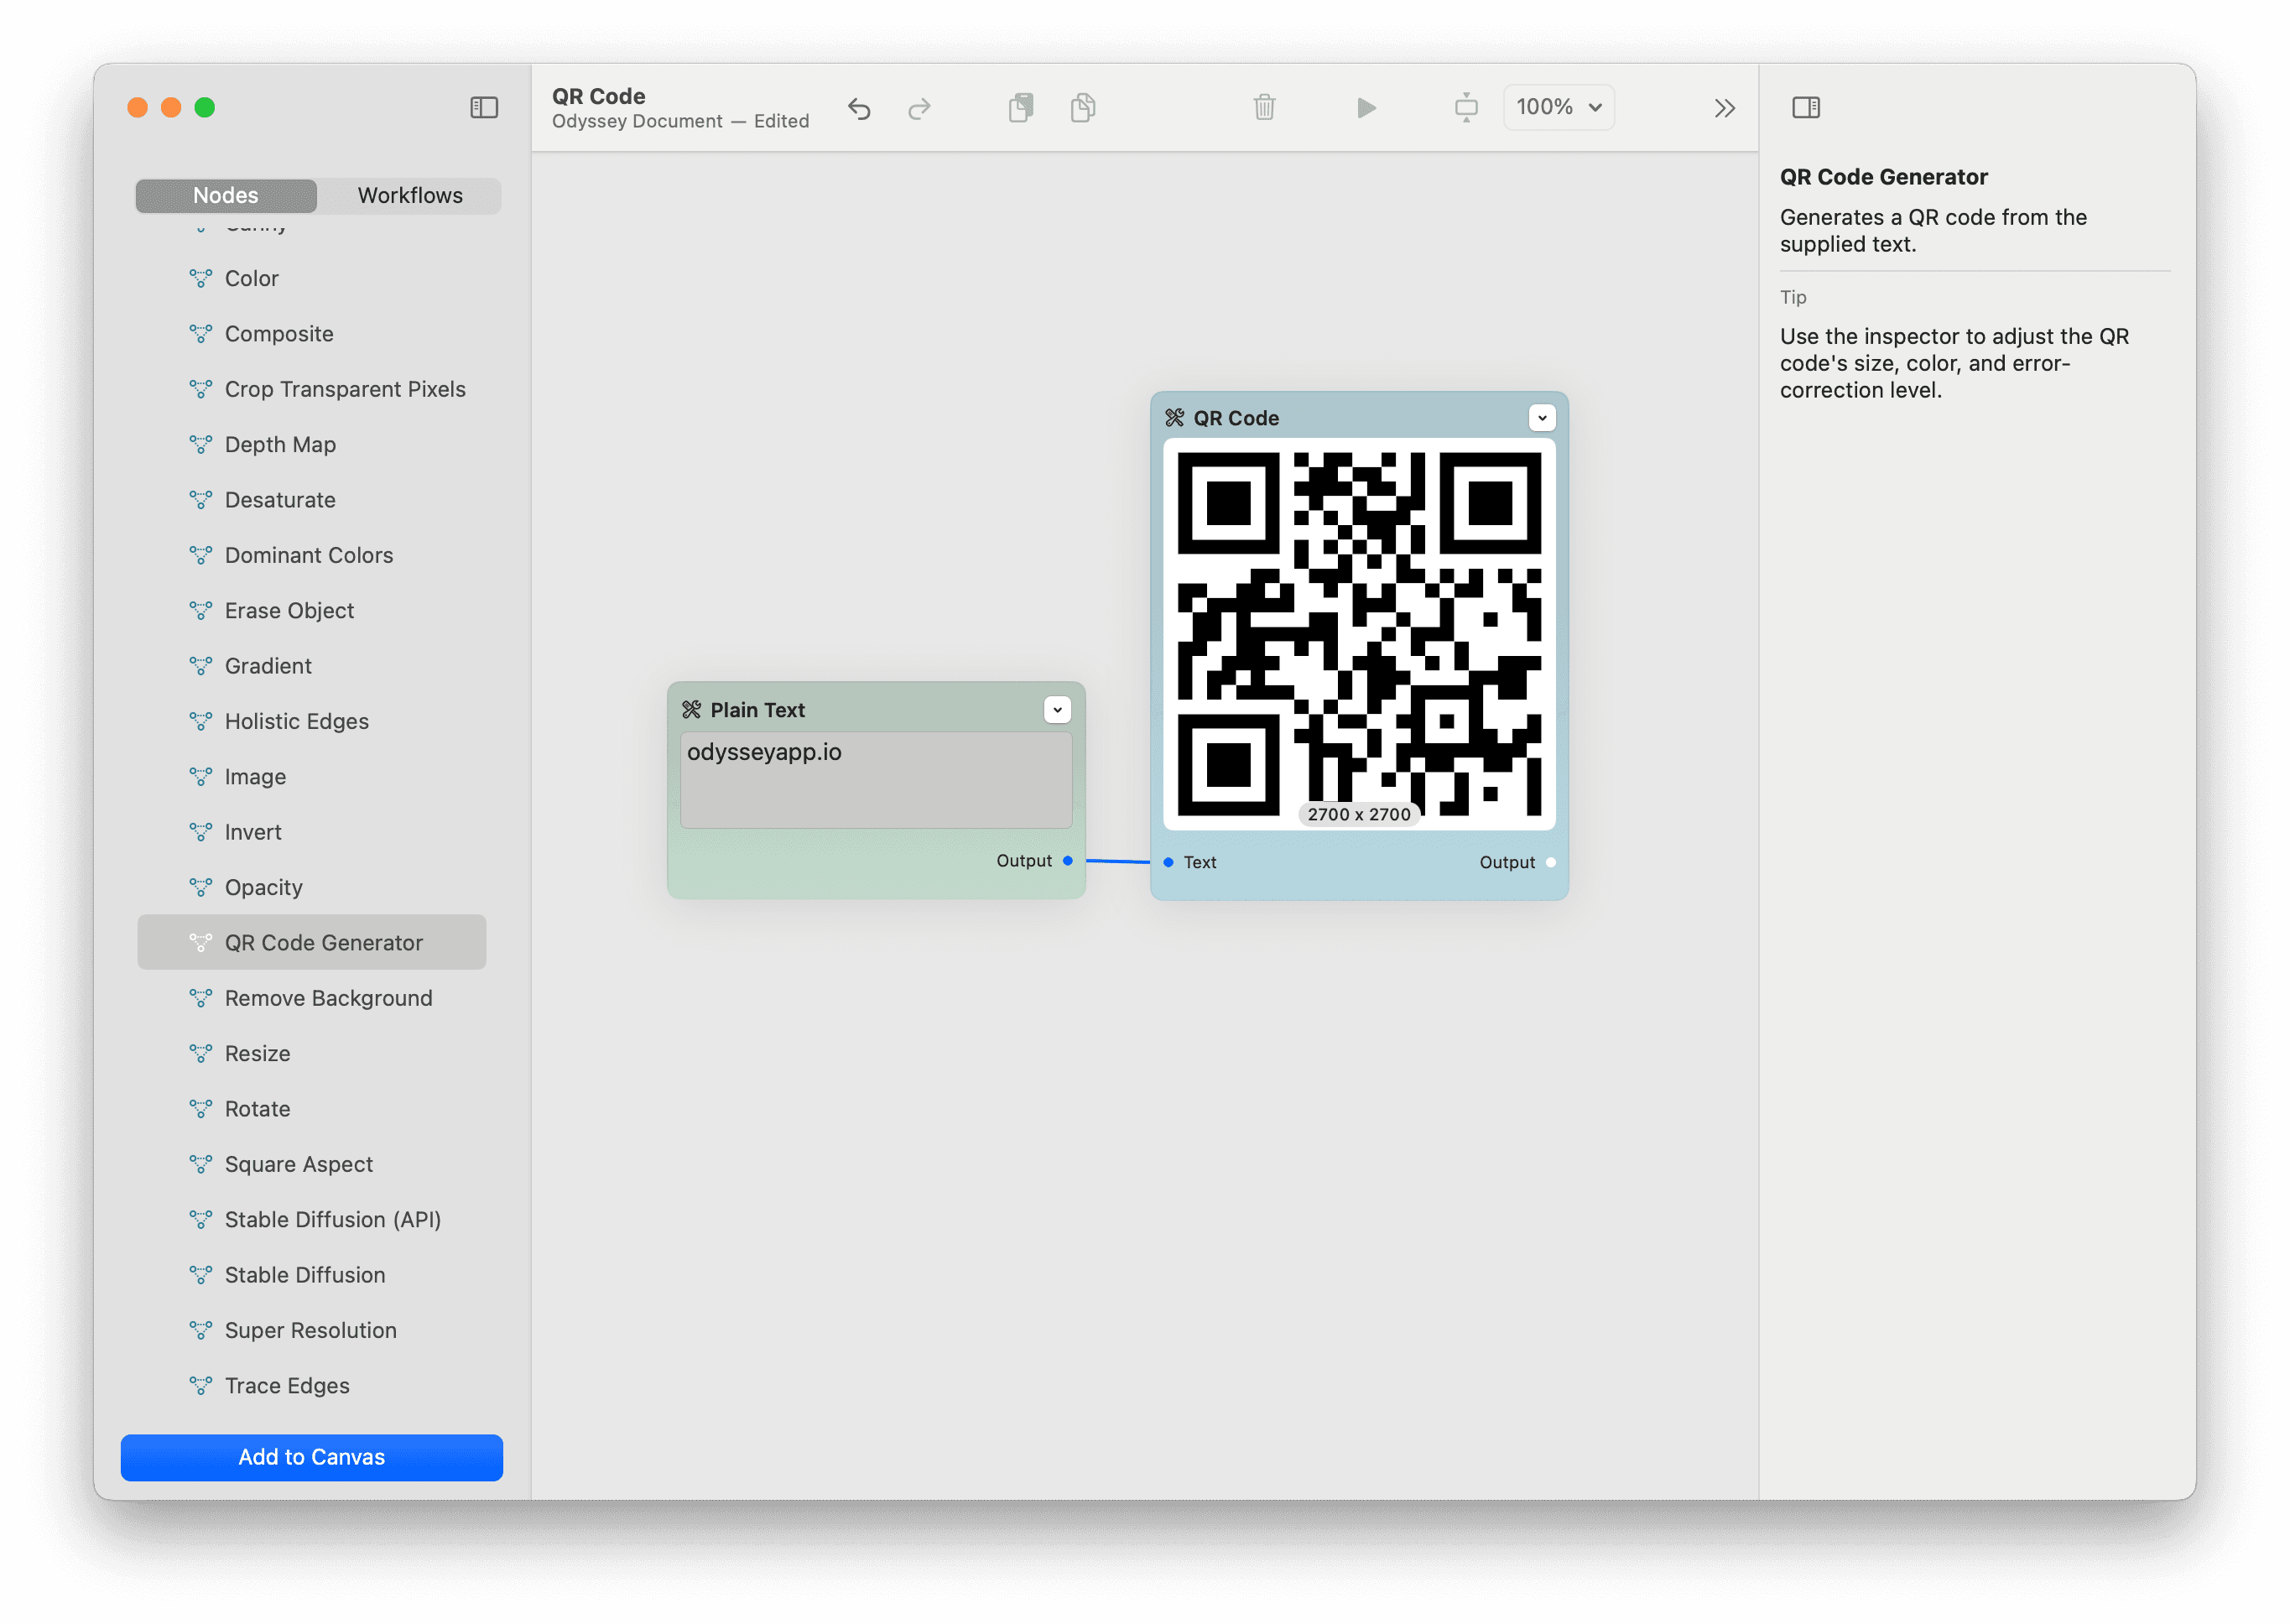
Step 1 - Create a QR Code with Odyssey's Generator
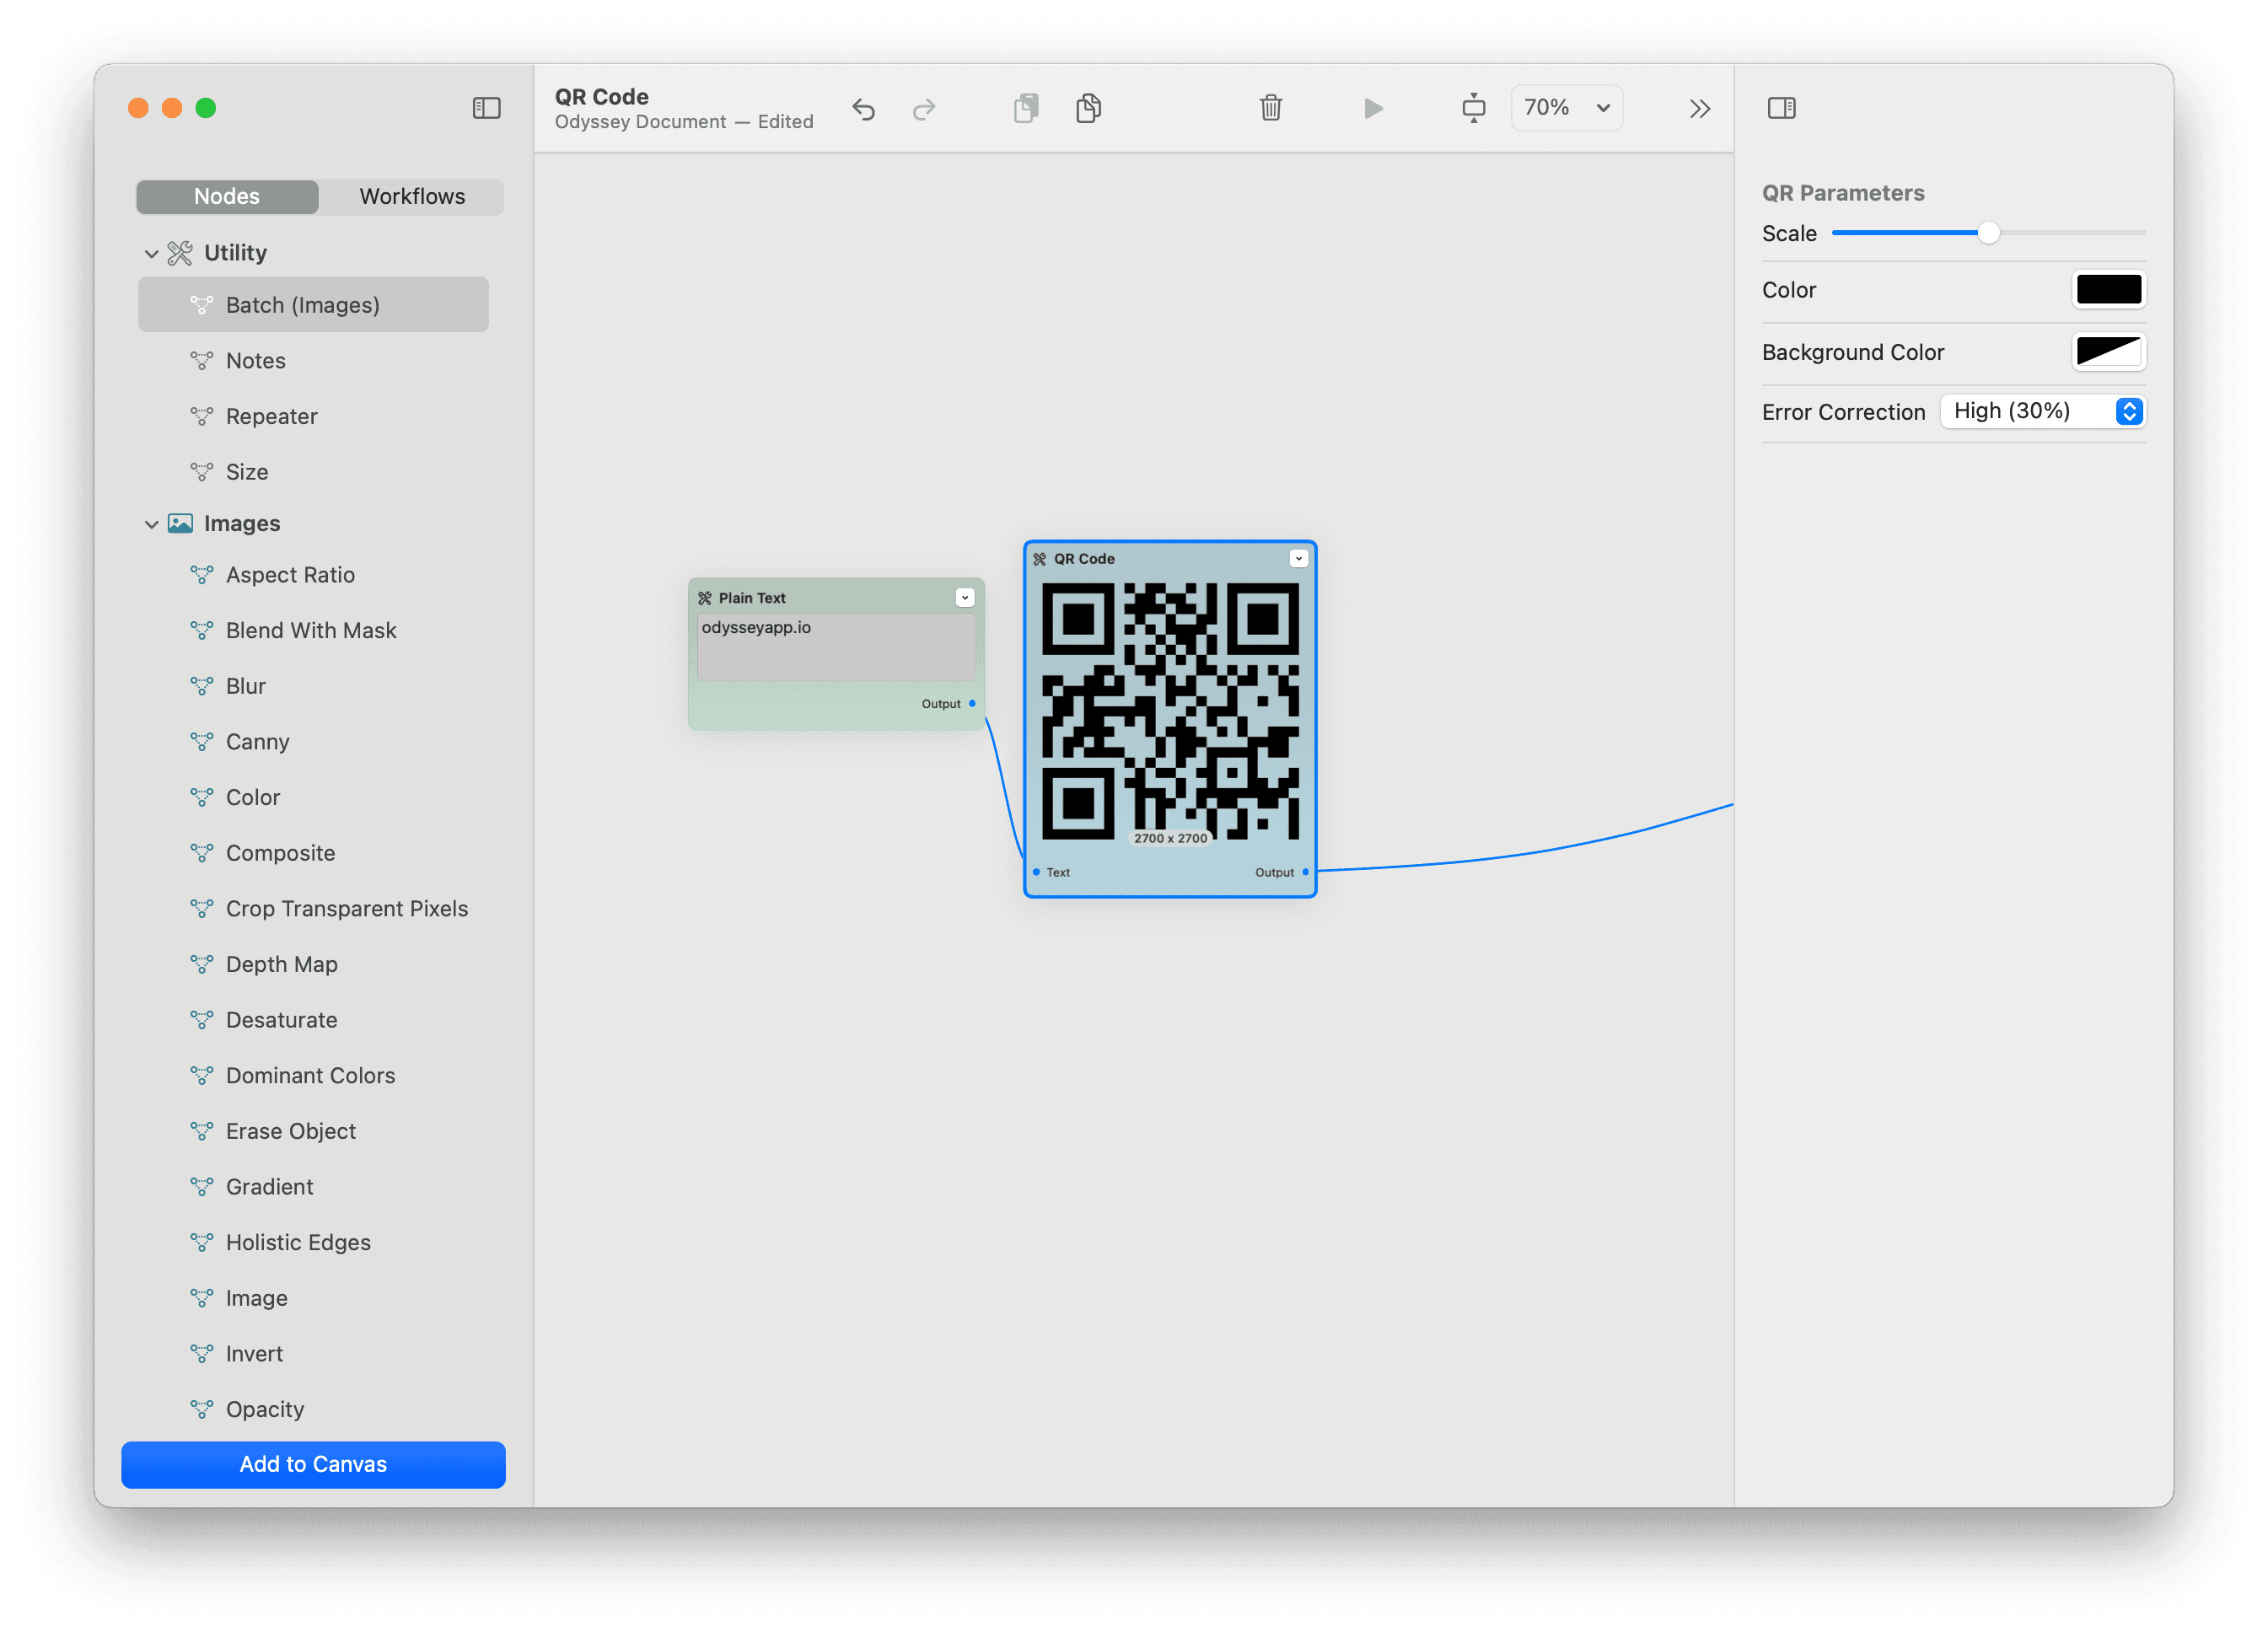
Odyssey's QR code generator is straightforward yet powerful. To create your QR code, simply input your desired URL into a plain text node and connect it to our QR code generator.
It's best to reduce the number of characters, so you should remove things like https:// or www. from your domains.
You'll find various settings like scale, color, and error correction, which ensure your QR code is both scannable and aesthetically pleasing.
Scale will dictate the dimensions of your QR code while color and background color will determine what colors your QR code is. It’s best to make sure there’s a lot of contrast between the color and background color to make sure the QR code is scannable. Next, error correction determines again how scannable the QR code will be.
If you’re simply looking for a unique pattern in an image, feel free to make this low. But if you want your QR code to scan, it’s best to make it high.
This approach to QR code creation balances technical precision with creative flexibility, making it an ideal QR generator for AI art. We like to start with a QR code on a transparent background.
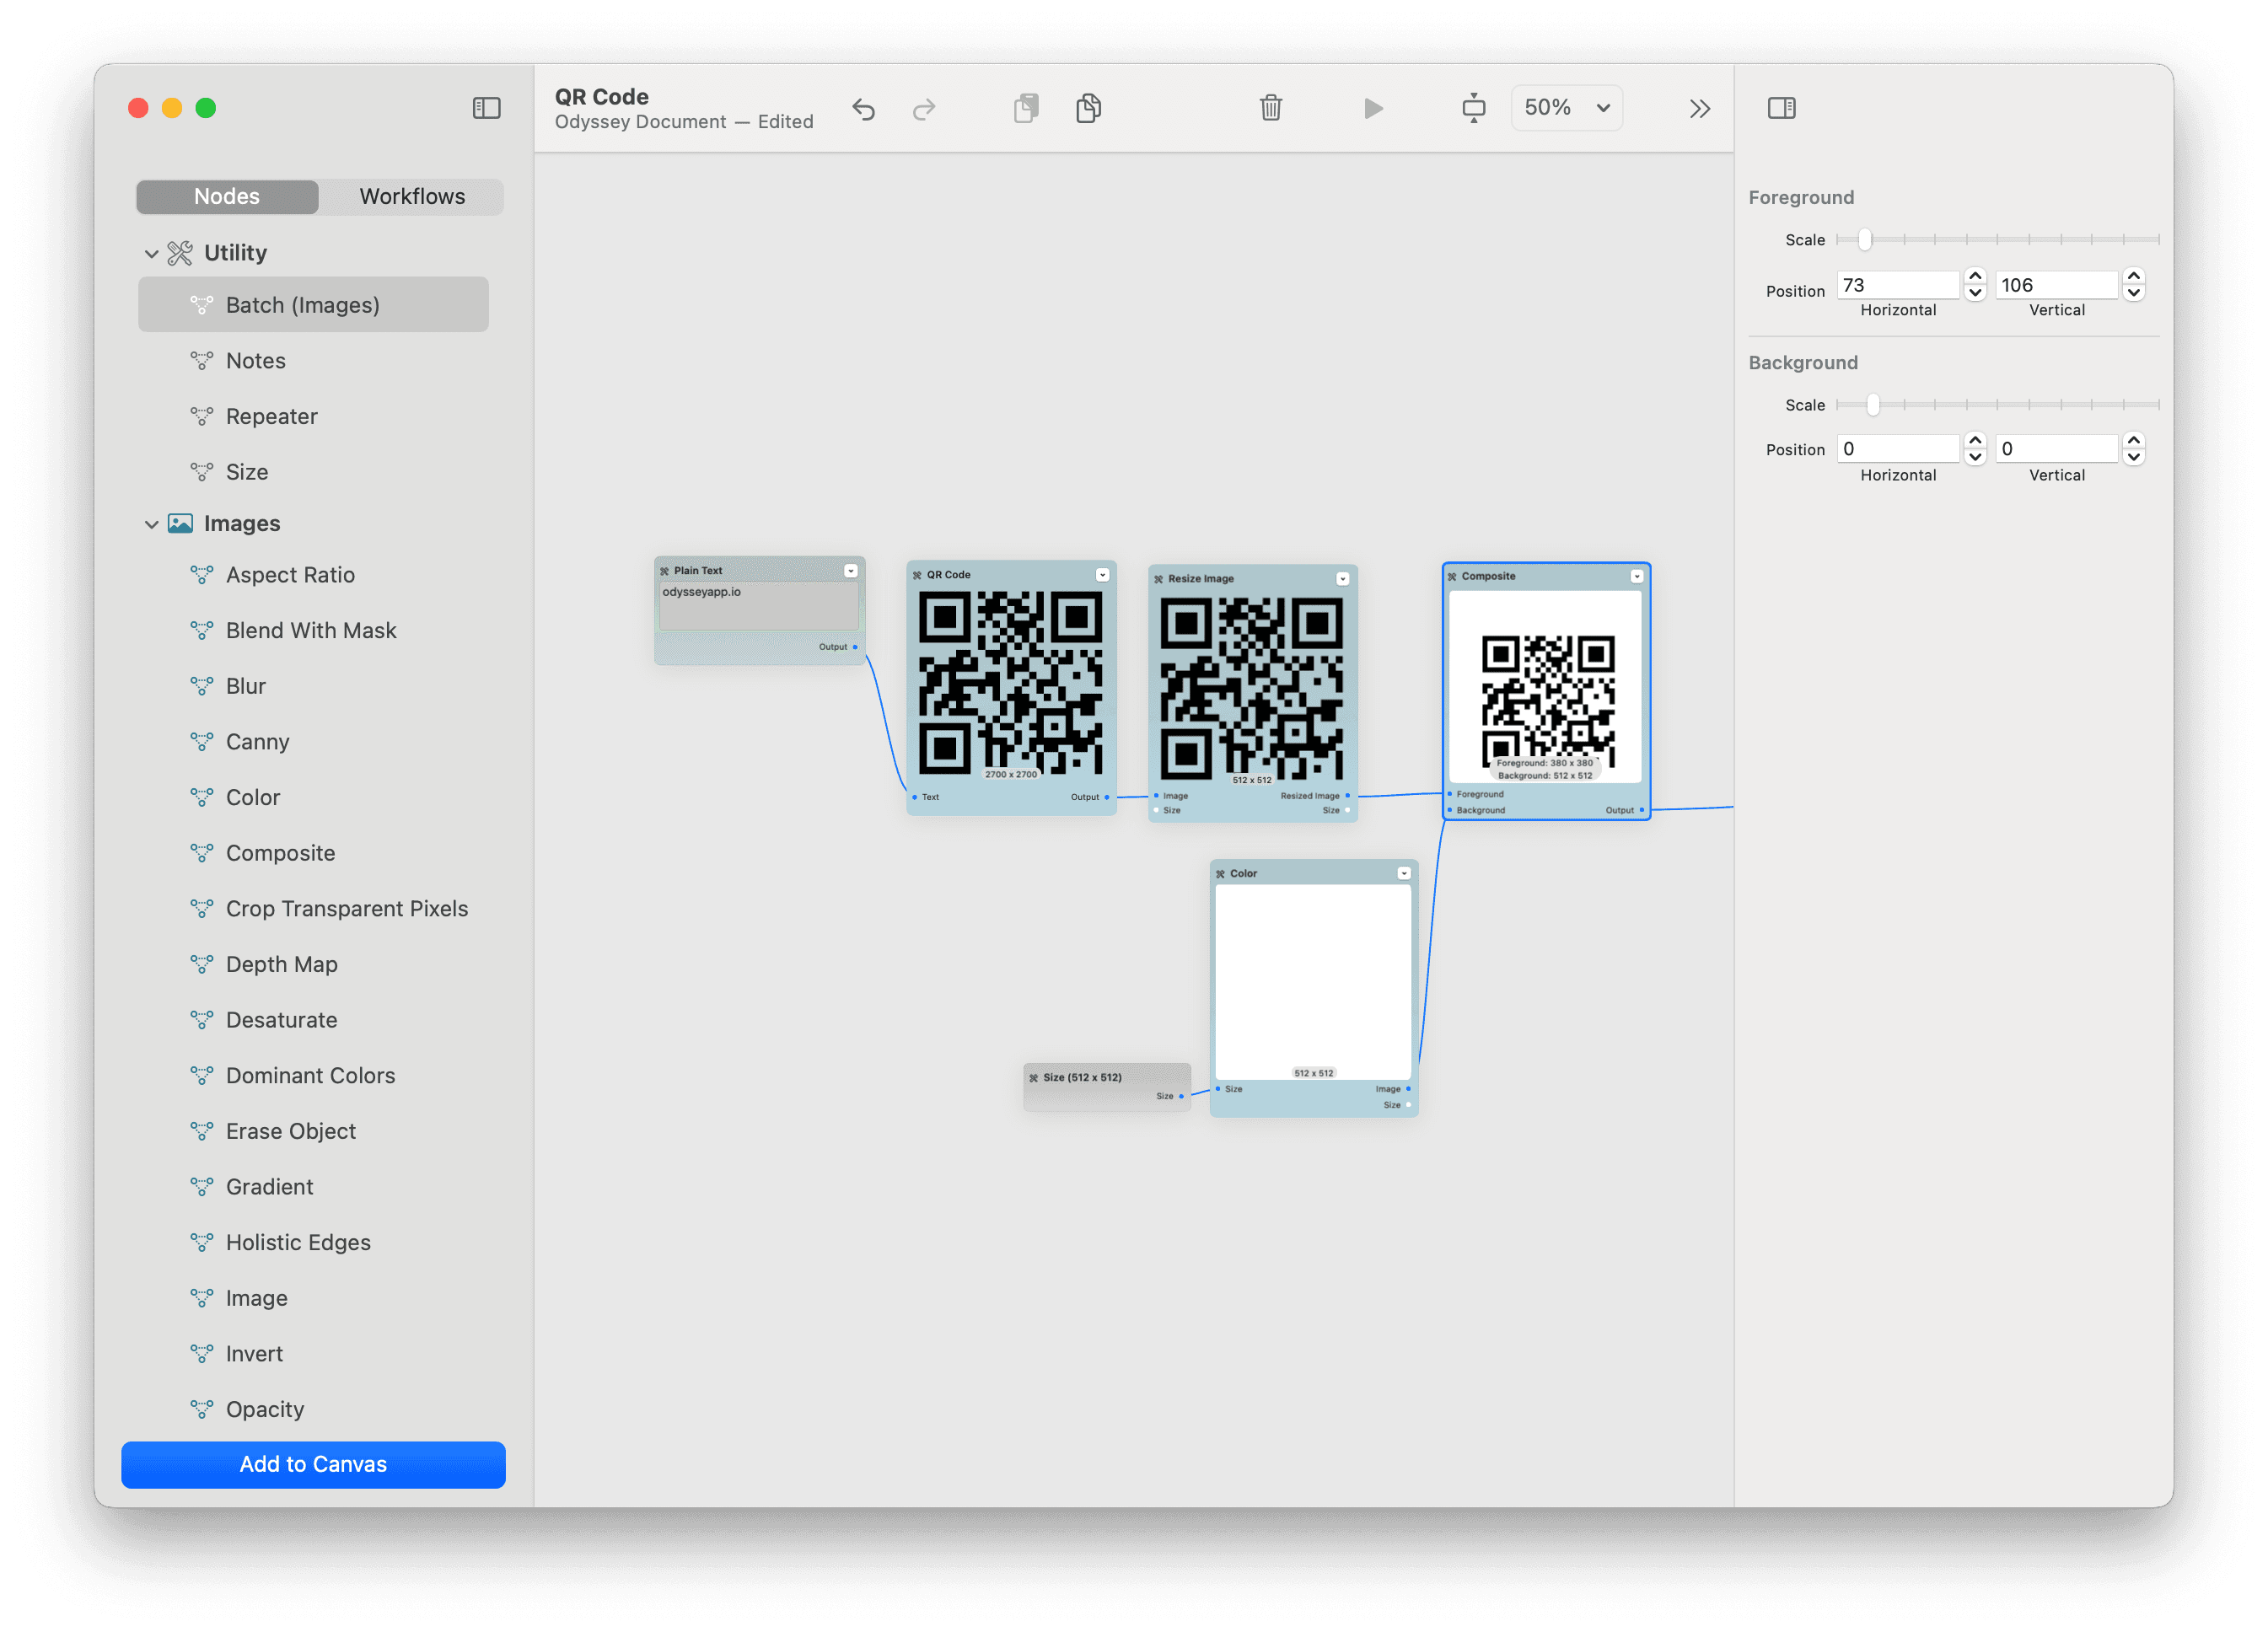
Step 2 - Adjusting QR Code Size for Control Net Compatibility
For optimal results with ControlNet and Stable Diffusion, your QR code should be 512 x 512 pixels. Odyssey allows you to resize your QR code and adjust its placement, providing a perfect canvas for ControlNet and Stable Diffusion to create hidden qr code art.
Simply connect your QR Code to a resize image node. We then brought in a Color node at 512x512 and composited it with the QR Code image.
From there, we adjusted the size of the QR code and moved it so it was lower in the frame. This gives an input to Stable Diffusion and ControlNet that gives a bit more room to creatively fill in the gaps around your QR code.
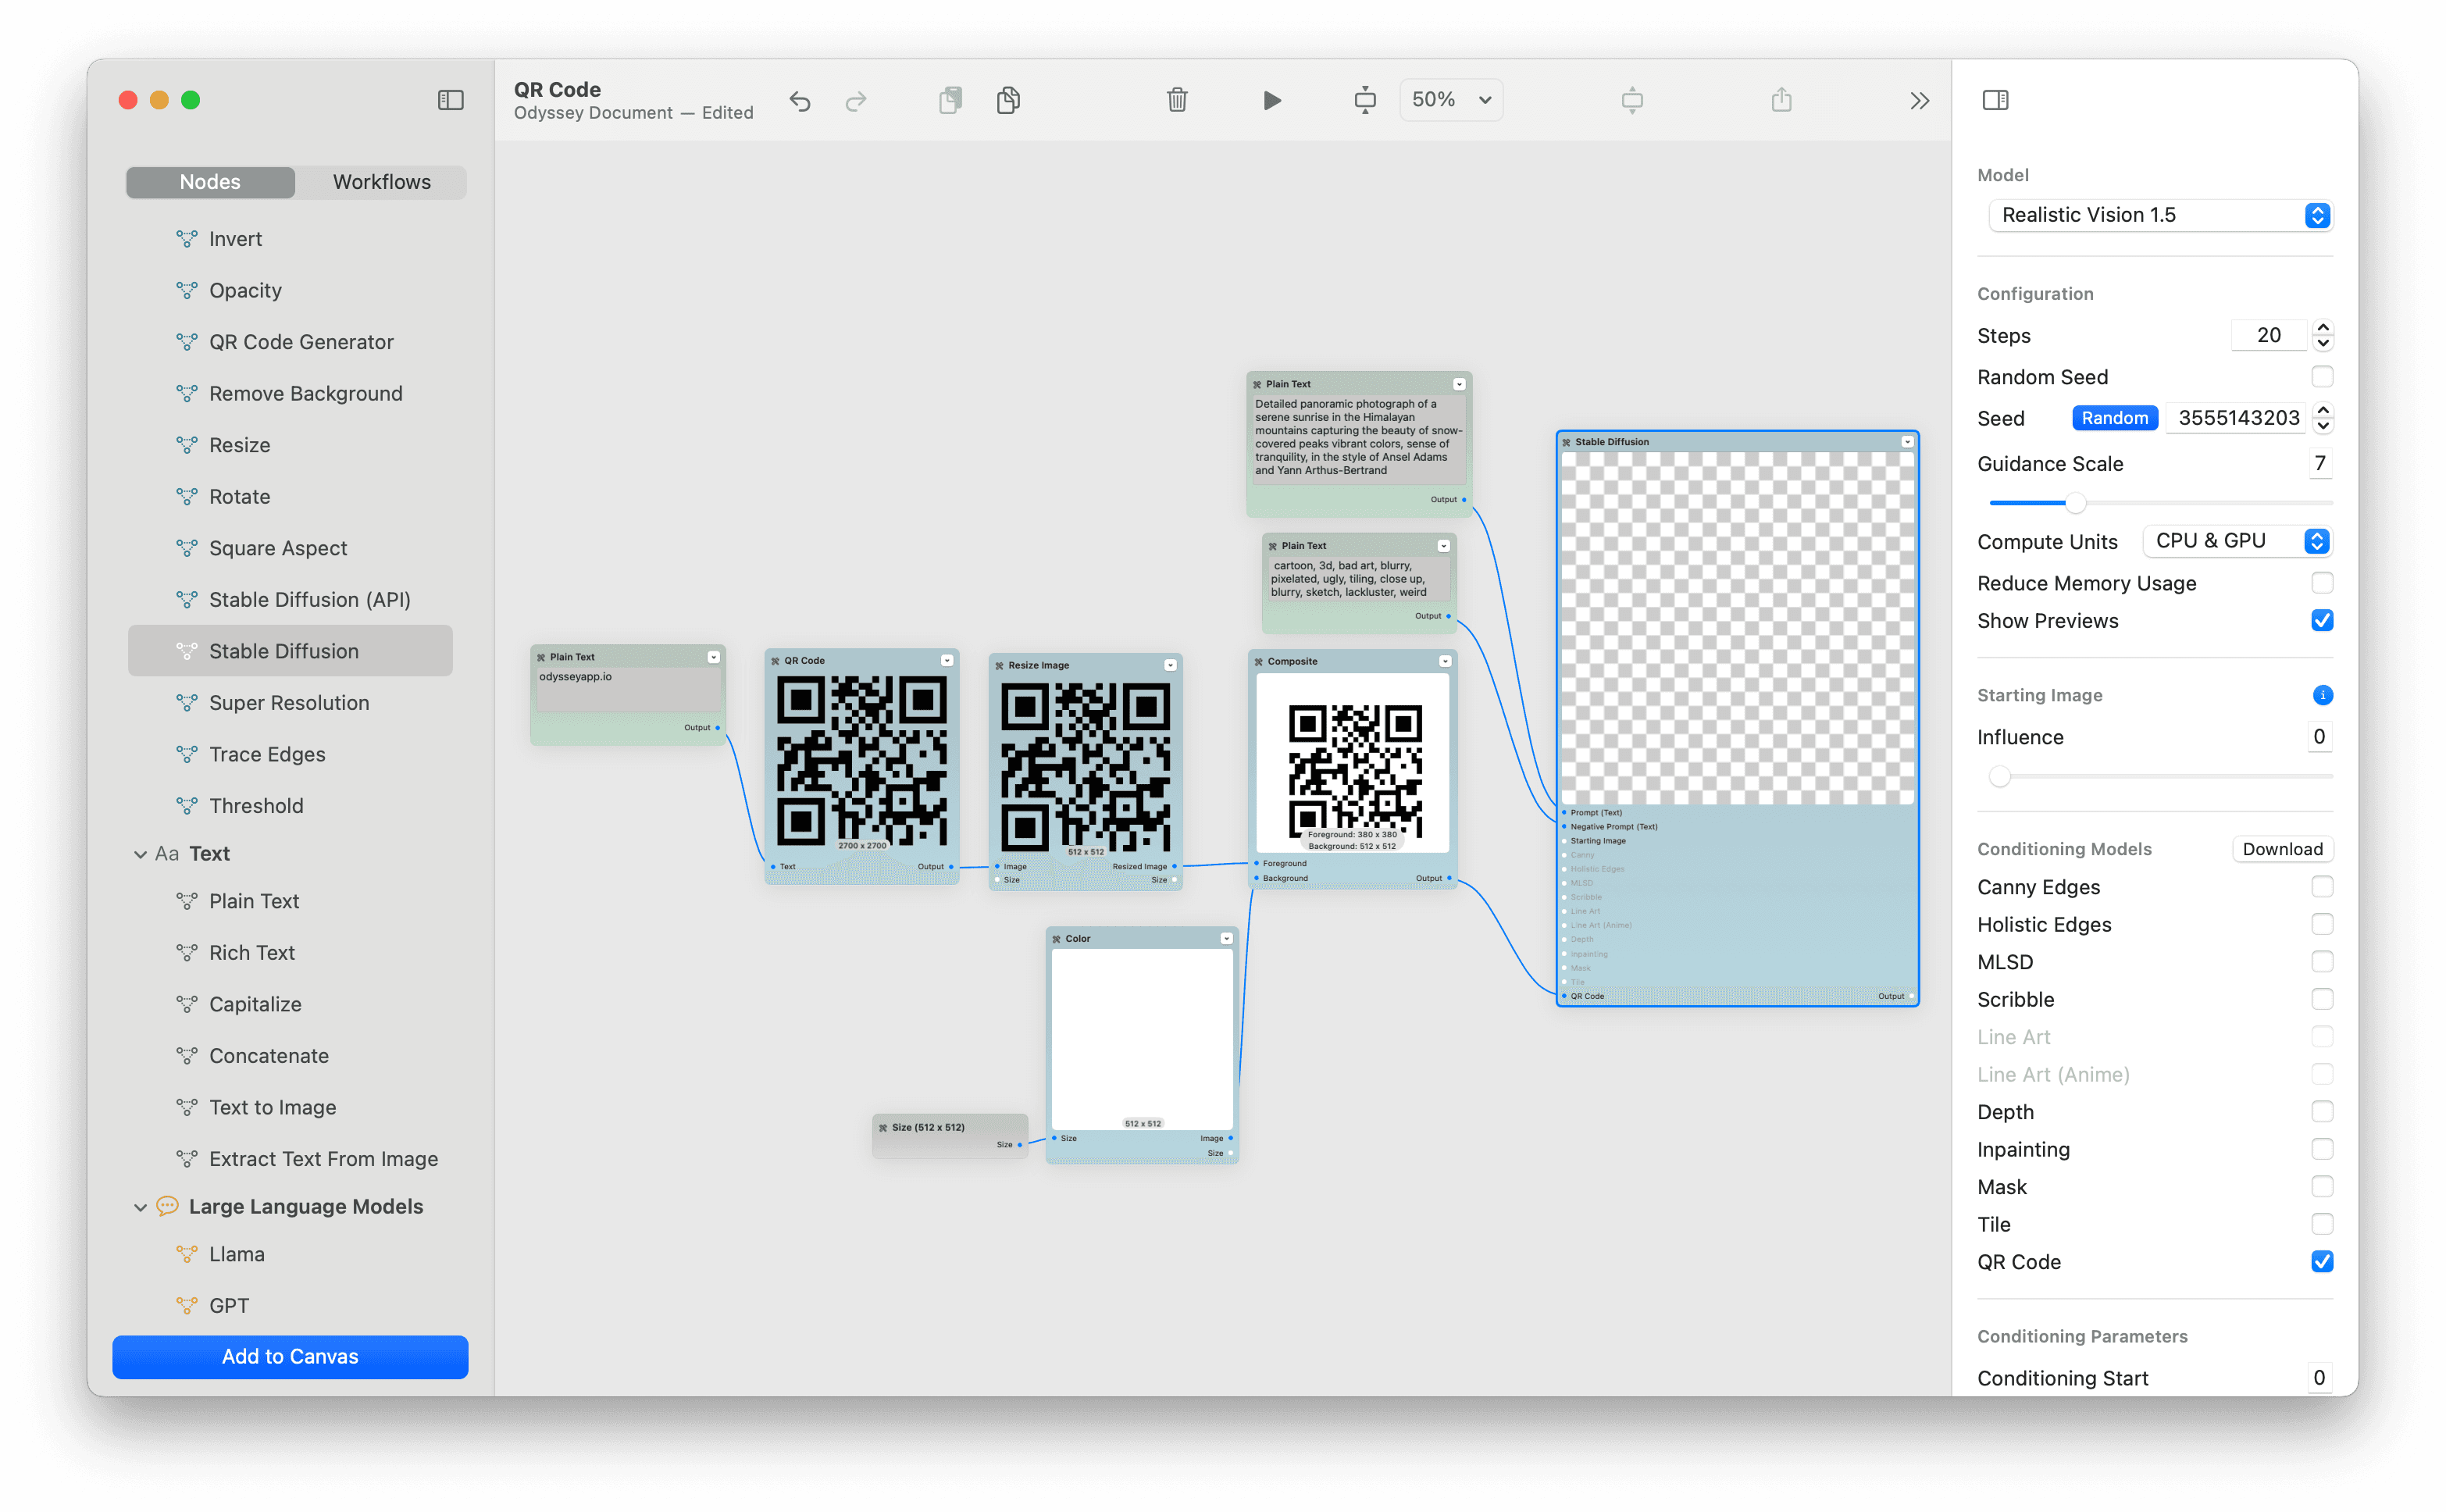
Step 3 - Choosing a Prompt for Stable Diffusion
With Odyssey, you can input creative prompts to guide the Stable Diffusion process. Whether you're looking to blend your QR code into a natural setting or create something more abstract, the flexibility of what you can create is almost infinite.
Drag in a Stable Diffusion node and add a prompt and negative prompt. For this QR Code workflow, we used the following:
Prompt: Detailed panoramic photograph of a serene sunrise in the Himalayan mountains capturing the beauty of snow-covered peaks vibrant colors, sense of tranquility, in the style of Ansel Adams and Yann Arthus-Bertrand
Negative prompt: cartoon, 3d, bad art, blurry, pixelated, ugly, tiling, close up, blurry, sketch, lackluster, weird objects, text, watermark, grainy, strange colors
We wanted a simple prompt just to demonstrate how a QR code can blend into an environment - but any prompt here will do. It's a lot of fun to play around with different prompts to see how the image reacts to the QR code.
Step 4 - Link the QR Code to ControlNet's QR Code input
Use ControlNet's QR Code Monster model to generate creative, scannable QR codes.
To achieve the effect around the QR Code, we are using ControlNet's QR Code Monster model. This is an extremely powerful model that can let you generate very creative, scannable QR codes.QR Code monster is now one of the more widely adopted Stable Diffusion ControlNet models - and we use it in a ton of workflows!
Select your Stable Diffusion node and look at the settings on the right hand side. The first thing you'll want to do is select your model. We've found that Realistic Vision works the best for this workflow since it supports ControlNet and is a visually striking model that works across a wide range of styles.
*If you didn't download Realistic Vision when you first launched Odyssey, click Odyssey > Settings (⌘,) > Downloads then scroll to Realistic Vision 1.5.
Once you've selected Realistic Vision, it's time to change your Stable Diffusion settings. The Odyssey workflow starts with the following presets:
Steps: 20 - fewer steps will generate faster but might be lower fidelity
Random seed - randomizing the seed will create more diverse results. If you find a seed you like, simply uncheck random
Guidance scale: 7 - guidance scale determines how closely the image generation follows your prompt
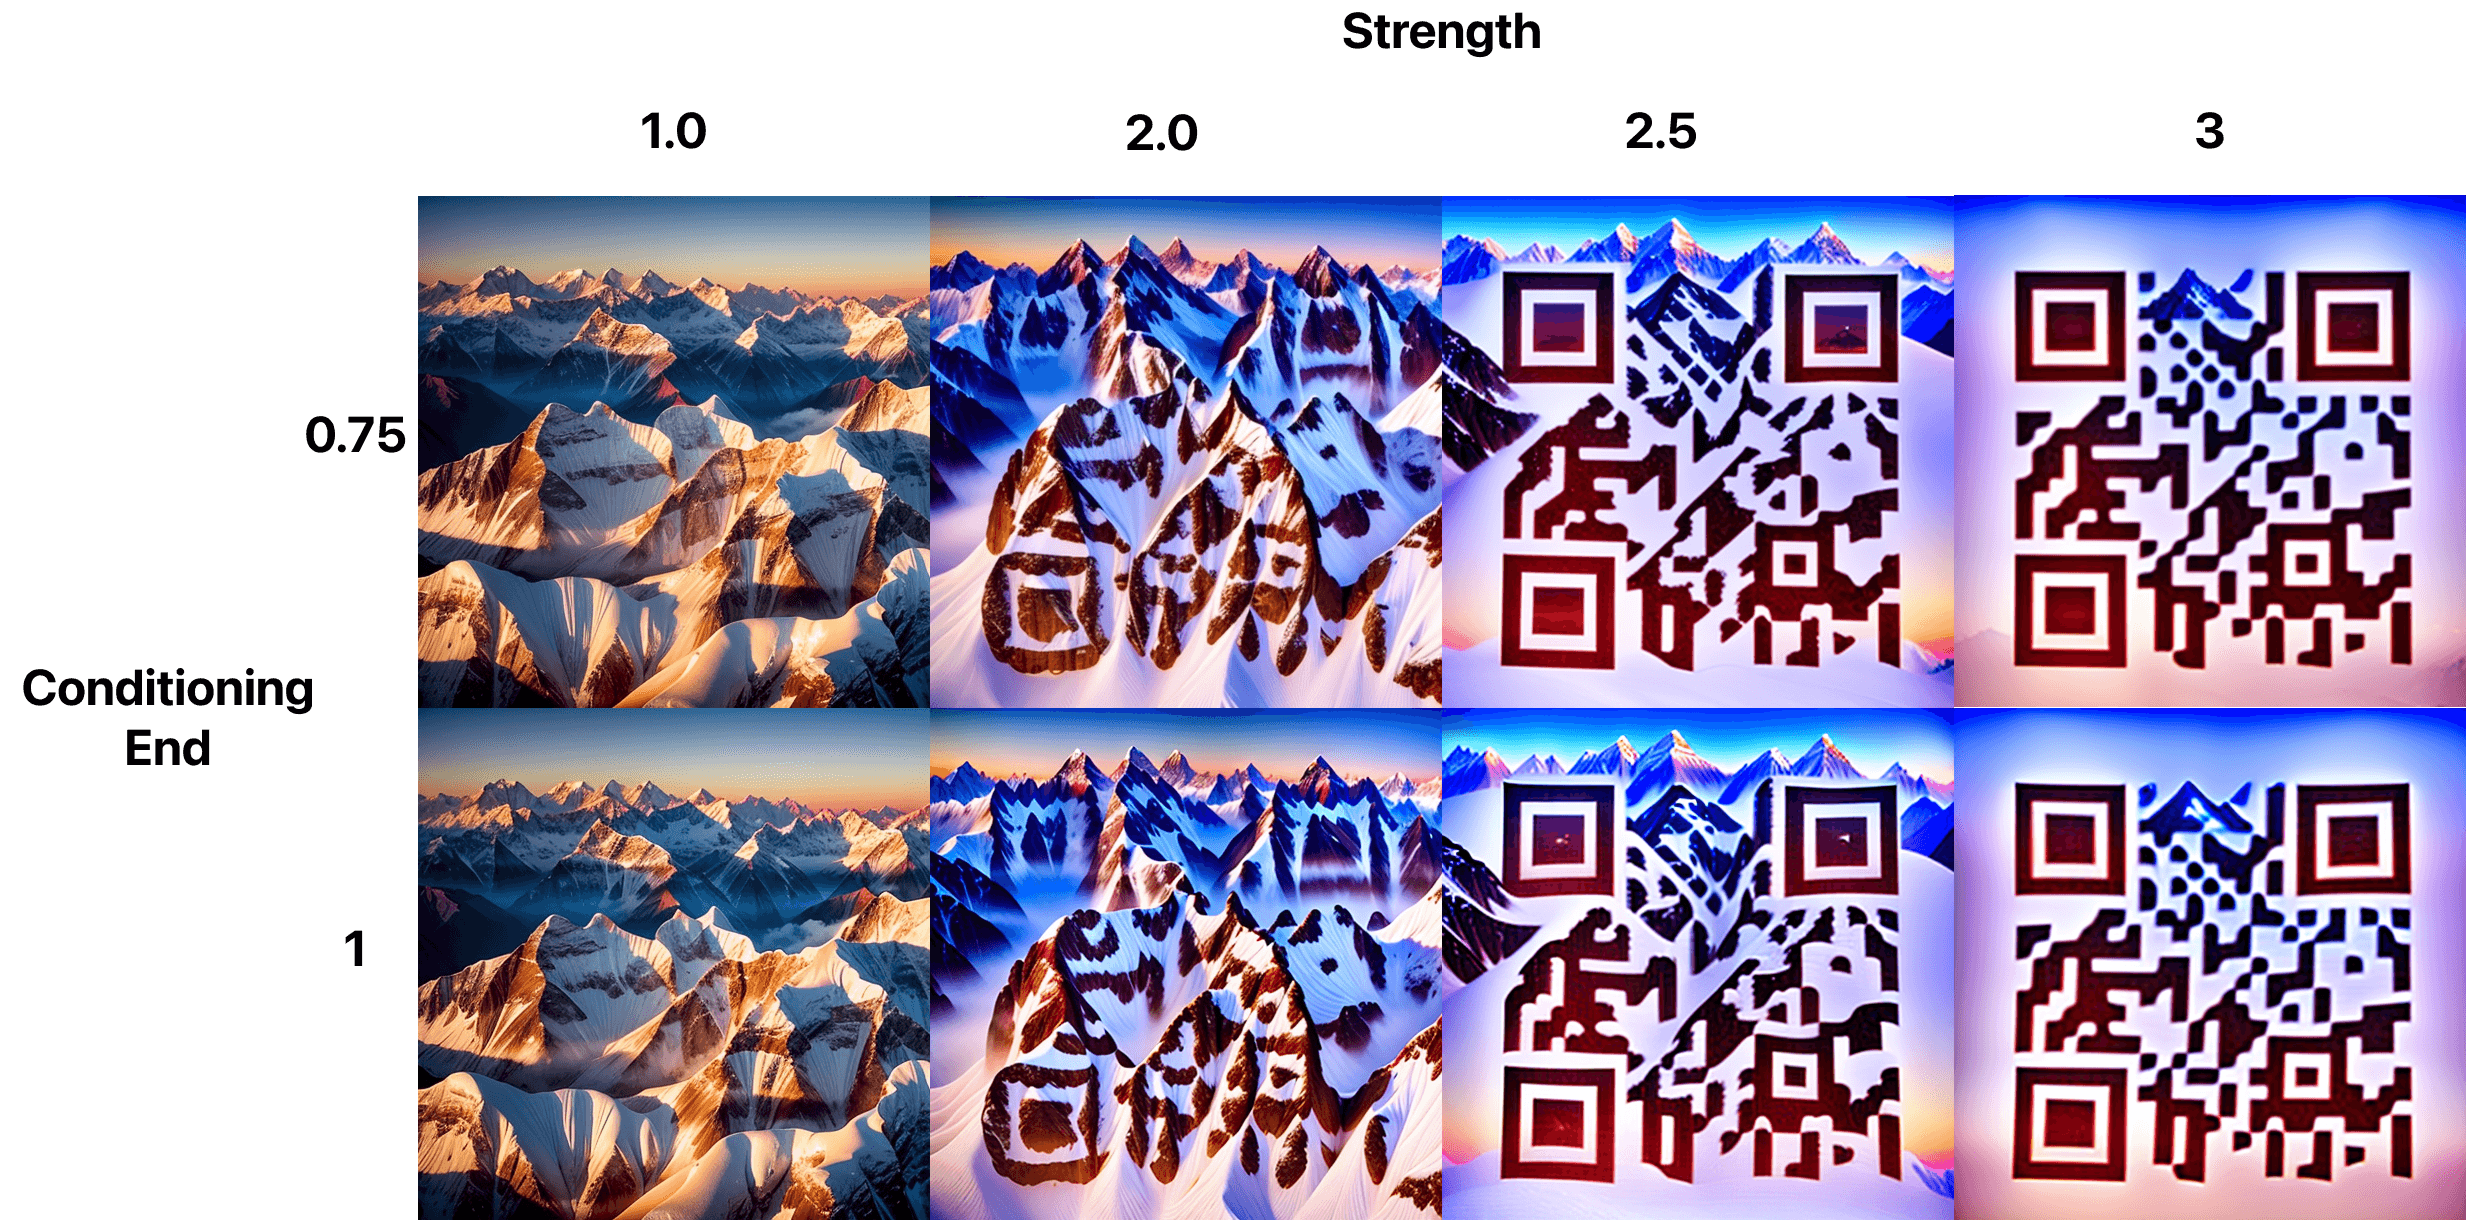
Next, let's look at the Conditioning Models. First, check QR code. From there, you can change the strength that ControlNet has on the image.
Conditioning start dictates which step your ControlNet input will begin impacting the image
Conditioning end dictates which step your ControlNet input will stop impacting the image
Conditioning strength determines how much the ControlNet input impacts the steps it impacts
Conditioning guidance determines how much the image generation adheres to the ControlNet input. Higher guidance means higher adherence to the input
For this workflow, we start conditioning at the beginning of the workflow and only end it at 0.9. The conditioning inputs will dramatically impact the image output and are quite sensitive. The higher your conditioning strength and the more steps your QR code is included in, the more likely it is too scan but the less creative your end result will be. If you are getting inconsistent results, use these sliders to impact the effect.
Let's look at how the Conditioning End and Conditioning Strength impact the same seed value can lead to different results.
Realistically, you can ignore all of this and just type in what you want your QR code to link to and connect it to the QR Code input on the Stable Diffusion node - but there’s a lot of fun with experimentation.
Step 5 - Run the Model
Finally, run the model and watch as Stable Diffusion generates your unique, creative, scannable QR code.

Further Exploration in QR Code Art
The future of creative QR code art is bright, with tools like Odyssey's AI QR code art generator leading the way. Whether for business or personal projects, this method of creating QR codes offers limitless creative possibilities.
This workflow is designed to give you a foundational understanding of how to create AI QR Code Art using Odyssey's advanced tools, blending the functionality of a QR code generator with the creativity of art generation.